FAIS Network Site Quick Tips

How to update an image in a table

Use Advance Editor in a table

  • Click on “Advance Editor” on the table.
  • Find the cell that will be updated and click the cell.
  • Delete an old image file from the cell in a table.
  • Click on “Add Media” and select a new image file and insert it into the cell of the table.
  • Click “oK” on the “Advance Editor” window.
  • Click on “Save Changes”.

Adding an accordion

Follow the steps below to add an accordion page to a WordPress page.

  1. Navigate to the desired WordPress page.
    1. Ensure that you are signed in.
  2. Click Edit Page in the top banner.
  3. Find the desired location of the accordion
  4. Add an opening <h3> tag and a closing </h3> tag.
  5. Add an opening <div> tag and a closing </div> tag.
    1. In order for the accordion to work properly it MUST be setup with the <h3> <div> structure.

Below is example code from the Modernization FAQ page: URL: https://modernization.wsu.edu/faqs/

<h3>The Title for the header</h3>
<div>

Some text that we want hidden within an accordion (or expandable section).

</div>

This will produce the below effect:

It’s important to note that the Modernization page has unique styles applied so the accordion colors and font may appear different on your site.

Changing page visibility

  1. Make sure that you are signed in.
  2. Navigate to the page that you wish to hide from the world.
  3. Click the Edit button at the top of the page.
  4. Click the edit link next to “Visibility: Public”
  5. Select the “Private” option.
  6. Click “Ok”
  7. Clikc “Update”

Your page is now hidden from the public.


Full demonstration:

Adding list styles

When a list is first added to the page using the bulleted list option  it will undergo a fair amount of automatic styling and it can be a little unclear how to apply a different style.

Automatically styled list:

  • Item 1
  • Item 2
  • Item 3

Example of an alternatively styled list:

  • Item 1
  • Item 2
  • Item 3

The process to make a list with different bullet points is pretty simple once you know where to look.

  1. Create list items
  2. Make the list a list by using the  option.
  3. Select the following option from the Formats menu.
    1. Formats -> Lists -> nice-number (ul/ol)

See it in action below!

Checking for 404 broken links

  1. Navigate to analytics.google.com.
  2. If you have been setup with access, you should be brought to the “All Account” page.Google Analytics ALl
  3. Access the Behavior report from the left hand side of the window.
  4. GA_Site list
  5. Select “All Pages” underneath Site Content.
  6. Set a date range for the desired timeframe (Make sure to pick a range you have not yet done. Best to look to the last date of any redirects placed.
    1. Also avoid weekend traffic as your only days selected).
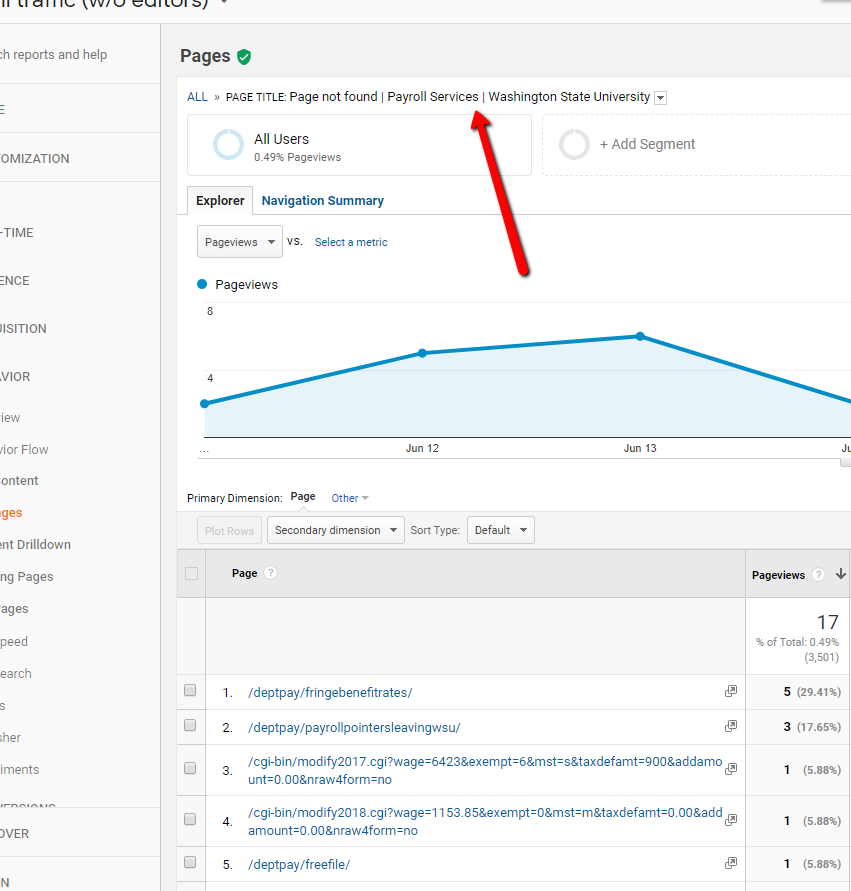
  7. Change the Primary Dimension to Page Title.
  8. Scroll through the list to look for “404” or “Page not found”.
  9. Click on the title of the not found page to get the URLs that need a redirect. You will notice at the top that it tells you the title of the page you are on so you know the URL’s you are looking at are correct.
  10. Use a redirect to correct those URLs.

Clearing link formatting

In order to remove the blue link color from a hyperlink we must do what is called clearing the formatting.

In order to to this:

  1. Edit the page on which the links exist.
  2. Using the visual editor highlight the desired links.
  3. Click the “Formatting” menu list
  4. Select “Clear Formatting” from the list
  5. Click off the selected links

You should see that the blue formatting that was previously being applied to the hyperlinks is now removed.

See it in action below:

Image file types

Different file types are better suited for different image types.

GEEK SPEAK:
The main thing to consider is image compression. JPEGs can handle image compression whereas PNGs cannot. PNGs end up creating an index of every color used in an image. If you have an image that has a gradient or a wide range of colors all that data ends up being stored in the PNG image file causing the file to size to get really large really quickly.

The general breakdown is to use PNGs or GIF image formats for solid colors and to use JPEGs for TIFF image files for things like photos, or anything that has a gradient.

Inline links

When working with links in a text block a couple rules need to be followed to remain in compliance with the ADA.

  1. If the link is *inline with text then it is NOT a button.
  2. If the link is inline with text but not **in flow it MUST be a button.

This is demonstrated in the image below where the red represents a piece of linked content.

Definitions:
*inline with text – In this context, this refers to a link that is used inside of a text block.
**in flow – In this context, this refers to a link that is used inside of a text block but is not used inside a block of text and is meant to be separated.